Welcome to Guitar Music Theory Day One
Fretboard Orientation
To understand visual images particular to guitar music theory such as tablature, chord diagrams and scale diagrams and even staff notation it’s important to get an understanding of orientation of pitch and the physical placement of the hands on our instrument.
Go straight to Orientation Video
Pitch Direction
To summarise pitch direction: the bigger the string the slower it vibrates and therefore the lower the pitch. Likewise the smaller the string the faster it vibrates and therefore the higher the pitch. Music is an aural domain. That is to say it operates in a listening world of experiences. It makes good sense to trying to keep orientation focused on the sound of things rather than the look of things.
To get more information on understanding of pitch directions go to the Theory Ground Floor page.
"Handedness" Plays a Part in Guitar Music Theory
There is also the consideration of right or left hand dominance. If you want to know more about left-handed guitar go to the Left Handed page.
For now we will stick to the right-handed convention of guitar music theory where the right hand strums and the left hand frets.
Ok so if we can in a logical way label the strings and relevant guitar parts with names that make sense we can relate these visual items to sound and pitch direction.
Relating Sight to Sound
One way of understanding graphic or visual representations of the guitar is to keep it simple by saying that:
A piece of paper that you are looking at is the guitar you are looking at.
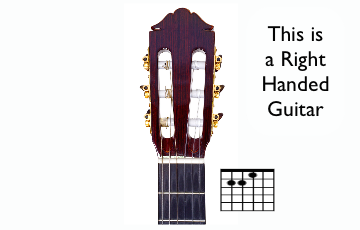
For example if your guitar is up against a wall or on a stand with strings facing you, you will see the headstock pointing upward toward the ceiling and the three bass strings to your left side and the three treble strings to your right side.

If you pinned a chord diagram up on the wall next to it with the “picture” of the guitar oriented so that the strings “drawn” on the paper were parallel to the “real” strings you would see this

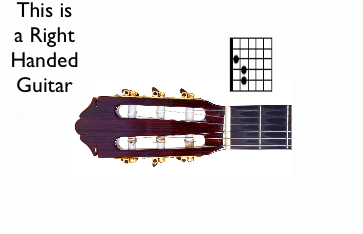
If you laid the guitar down on your lap, strings up with headstock to your left, then rested the piece of paper on it or next to the guitar with the “drawn” strings in the same parallel direction you would see this:
You must remember to keep the thick line on the diagram (or the diagram's appropriate border line) in the same orientation to the real guitar nut that it represents when you put, or imagen to put, the piece of paper on your lap.
Have a look at this video below. See if it makes some more sense to you. If you are or get confused, try not to worry. Keep exploring and returning. I am sure there will be something that will get that "penny to drop". Happy playing...

One Last Little Thing
Remember when relating physical things to guitar music theory, there are many types of guitar and therefore guitar headstocks but they are all pretty much the same in function. Have a look at a couple of different style headstocks below. If your guitar headstock looks different to the ones shown here don't let that confuse you either. Just look for the common parts like the tuning keys and nut. You can also go to the types of guitar page for more info.

Home>Top>Relating Sight to Sound>Go to Guitar Theory Day Two>click here to support this site
If you are local to the United Kingdom West Midlands Coventry Kenilworth Leamington Warwick Rugby Stoneleigh CV8 Post Code area and are interested in tuition feel free to arrange a “First session Free” Guitar or Theory Lesson. Perhaps you just want to *chat over a cuppa about the options for your children’s music education.
*N.B. Until further notice all interaction will be virtual or in full observation of distancing practices.
Playable Guitar
Rural Innovation Centre Unit 32 Avenue H
Stonleigh Park CV8 2LG +44 2476 998 500
International? Please contact me about Skype lessons. Se habla español – pues bueno un pocito!
click here to see other ways to support this site
Got suggestions or questions?
Want to try a free Skype or Zoom lesson?
Got a testimonial? click here
Click the link to the contact form above or write to me at the address shown and I will get back to you as quick as I can !
Happy playing!


